Stitching Times serves up stories, examples and tutorials about needlework related crafts, especially quilting and crochet. Almost all of the projects shown have been designed by Kay Stephenson

Monday, October 29, 2012

Is it Fall Yet?


Having grown up in Northern New York State, I still expect cool weather and turning leaves to arrive in September.  Here we are days before Halloween in Atlanta and the maple in the front yard is finally starting to turn. I even had to turn the heat on for an hour this morning to take the chill off the house. Two days ago I was still wearing shorts and sandals, but I know that fall is here because the Bottle Gentian Gentiana andrewsii is blooming.
As are the New York Asters Symphyotrichum novi-belgii
And the Virginia Creeper Parthenocissus quincquefolia that rambles over the fence is turning such a lovely shade of red.
Just never mind that the Plumbago Plumbago auriculata still thinks it’s July.

Despite all those green leaves out there, in two days munchkins will be ringing the door bell and I’ll be wishing I could still eat enough candy to make me sick without gaining an ounce. In anticipation of the fall colors that will eventually come to the maple tree and the pumpkins pies that will be topped with real whipped cream (no cool whip in this house), I made this simple table topper.

Want to make one too? It’s pretty easy. I had about a yard of a fall themed focus print fabric that a family member had left over from another project.
From this  I cut a rectangle that was the size of the repeat with an extra ¼ inch on all sides – in this case the repeat was 12 by 12 inches, but yours might be smaller or larger.

Next I dug through my stash and pulled out a variety of solid and small print fabrics that echoed the colors in the focus print. With these I started building up borders. In addition to the solid black and white borders, I cut the assorted fabrics into three inch by the width of fabric (WOF) strips. These were sewed together and then subcut into more border strips. I cut four corner squares from the focus print, picking out details (in this case leaves and sunflowers) and assembled all of these in a design that was pleasing o me. I love improvisational projects like this, figuring it out as I go. Don't you?
Oh, and while I was at it, I made this…

to hold a nice bottle of cognac for a friend. Sidecar anyone?

Monday, September 17, 2012

Everyone Needs Real Cloth Napkins


I’m sure there are good reasons for using paper napkins. Small children eating spaghetti comes to mind. But don’t we all deserve the touch of real cloth once in awhile? Over the past couple of years I’ve made many sets of napkins for my own home and for others. Some are full size dinner napkins, which are easy to make from standard quilters cotton – four to the yard with a bit left over for another project.
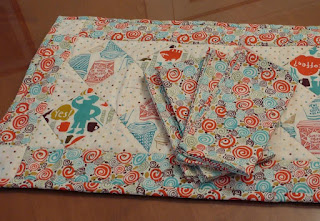
I  have napkins to match my everyday placemats.
Friends and Family have napkins to match the insulated table runners I’ve made for them.
I made some holiday napkins to go with a wall hanging… fa la la.
And napkins just because this Kaffe Fassett fabric washes up so soft and the colors are so warm that it seemed to want to be at the table.
And then there are the cocktail napkins - so handy when friends drop in for snacks.
Finished with either a hand sewn whip stitch, or a straight stitch on the machine this is a quick and easy project, and the more you wash them, the softer and more absorbent they become. Depending on how much your chosen fabric shrinks up, you can get 4 large dinner napkins (roughly 16 inches square after hemming) or 12 cocktail (about 9 inches square after hemming) from one yard of fabric. Best of all you won't need a pattern. Just wash and dry your fabric, square up the edges and subcut into equal squares. Press and stitch 1/4 inch hems (doubled over so you loose 1/2 inch on each side). If you want to be fancy you can even make neat little miters at each corner. Voila, a quick hostess gift or a practical item that you can use for years.
What’s that you say? Do I iron them? Nope. Oh maybe if extra special company was coming... like the queen. For friends and neighbors I always think guests are more comfortable if it doesn’t look like you fussed. 

Monday, July 9, 2012

More Iron-on Vinyl Questions


Over the holiday weekend I had a question from a visitor to my blog. She was reading my post about working with iron-on vinyl and wrote:
I am wondering if there is a way you can make bigger projects, like an adult full apron, by bumping 2 pieces of the iron on vinyl up against each other on the fabric in order to have a wider section covered. Will this work? Should it be slightly overlapped? Or is it, sadly, only for smaller width projects?
Unfortunately the iron-on vinyl made by Therm-o-web only comes in 17 inch widths. That’s very limiting, so my reader posed a great question. It was one I didn’t have the answer to, so this morning I headed to the studio for a bit of experimentation. Since I didn’t plan to do anything with these samples other than test the idea of applying multiple pieces of vinyl, I cut two small scraps of fabric left over from another project.
I also cut out two scraps of Therm-o-web for each test, two to match up side-by-side, and two to overlap. I really expected the side-by-side to be challenging – lining up to pieces of material with a sticky side and positioning them perfectly always it. However I expected this method to work better than the overlap.
Well I was in for a surprise. As expected the side-by-side sample doesn’t look very good. The edges seem to want to pull away from each other and it just doesn’t provide the waterproof seal that using this technique is all about. Put this bib on the baby and the berry juice would soak right through that crack.
On the other hand, the overlap worked much better than expected. You may be able to just barely see one line of the overlap running through the heel of the skate, but the two pieces of vinyl fused not only to the fabric, but to each other providing a really strong bond. If you look closely in good light you can see the join, and you can feel the slightest bump when you run your finger over it, but I really do think this is a workable solution for using this product for larger projects. Just overlap by to a ¼ of an inch.
One other thing this test demonstrates is how easy it is to get unwanted hair, lint, and thread under the vinyl. Take good care to be sure that your fabric is completely free of anything you don’t want between it and the vinyl because once the sticky side touches the fabric it is very difficult to lift it and remove these items. After it has been bonded, it’s impossible.
What will I do with these samples? I think I'll cut out the skates, snowshoes, etc. and turn them into cute little holiday gift tags. Waste not and all that...

Wednesday, April 18, 2012

On the Road Again!

It's that time of year and we will soon be heading off to the beach for a week of sun, fishing, and dog play. While busily planning what to pack, dithering about a new swim suit and whether the cover-up covers enough, and the other minutia of vacation prep, I have also planned a good road trip project. Several years ago I became enamored with the idea of non-traditional yarn. First I tried making yarn with grocery store plastic bags. A couple of years later I made a cute bag with fabric scraps and included the instructions for making fabric yarn. This year I'm attacking the fabric scrap box to make rag rug style chair pads.
It couldn't be simpler. First follow the link above to make your yarn. What a great feeling that is for a Yankee-at-heart girl like me to use up all those scraps.
Now select a really large crochet hook. I used my US N/9.00 mm aluminum hook from Boye. Because the quilter's cotton fabric I used tends to be a bit sticky, the slippery aluminum works quite well. A Bamboo hook might offer a bit too much resistance for smooth crocheting.
If you don't remember your crochet in the round technique, take a refresher here. You may have to play with the increases a bit to make sure the pad lies flat. In this first sample I made ten stitches in my first round, doubled each stitch on the 2nd round, doubled every other stitch on the 3rd, ever third stitch on the 4th, etc. And if you find yourself running out of yarn before the chair pad is large enough, don't worry. Just add more strips of fabric as you go along.
A perfect "on the road" project. All you need is a bag of scraps, a crochet hook and a pair of scissors. Enjoy

Monday, April 9, 2012

Holy Hexagon Bat Girl!

Over the Christmas Holiday Craftsy started promoting a class by Amy Gibson titled " The Craftsy Block of the Month ". Now honestly this type of project has never appealed all that much to me. I'm not one for following other people's patterns as I like to make up my own. But, I saw that she was going to teach a couple of techniques I had yet to try and the class is free, so I signed up. We made several fun blocks in the first three months, but one of the techniques I was itching to try was English Paper Piecing.
April is the month and the designs Amy chose where all about hexagons. Now usually I knock out the blocks for the month within a days or two of the class module being published, but despite the apparent complexity of the blocks for January, February and Mark shown here, they are really quick and easy to put together using the machine and a rotary cutter. This month was an exception.
If you are familiar with the technique you know that one of the reasons quilters love English Paper Piecing is that all of the work is done by hand which means it's a great take along project for long car rides and peaceful vacations on the beach. If you are familiar with the technique you also know that one of the reasons quilters hate English Paper Piecing is that... all of the work is done by hand.

The two patterns that Amy designed (Hexi Stripe and Sunny with a Chance of Hex - my versions shown at left) were fairly straight forward with good sized hexagons. The sun is a 2 inch hexagon (measured as 2 inches at each side rather than the overall width and height dimensions of the shape) and the hexagons for the stripe are 1 1/2 inches. OK those little sunbeams are made up of 3/4 inch hexagons, but even those weren't bad.
I did discover one time saver. Through a little trail and error I found that if you cut a piece of freezer to size you can run it through your inkjet printer to make multiple of the paper hexagons much more easily than tracing them onto computer paper. After that it's a fairly mindless task of affixing the paper to a scrap of fabric, basting the fabric around the shape to hide all the raw edges, joining the hexagon's together, removing the basting stitches and paper pieces, and then hand stitching the designs onto your background fabric. That took a fair number of hours in front of the TV. But that wasn't so bad either. The real problem started when Amy challenged us all to use the technique to design our own blocks.


Now I have been working with a palette of holiday colored (though not necessarily holiday themed) prints so it seemed natural to design a Christmas Tree and some Snowflakes. The problem came in when I realized that I needed to make the shapes really small in order to get a clear enough representation. I ended up making them about 1/2 inch to a side and sister I made a lot of them - nineteen for each snowflake, and of course you have to have two so that the one won't look lonesome. For the Christmas tree I made 48 of those little beasties. Whine, whine, ouch, ouch. Why haven't I ever learned to be comfortable with a thimble when hand sewing.
For all the complaining though, I have to admit that I like the way they turned out. And this quilt is sure going to be colorful. Can't wait to see what comes next.